Monday, June 27, 2016

The Sangtoy

Sometime back a dealer brought in an odd one stringed instrument that he wanted to fix up and sell.  It had some minor finish damage and was missing the bridge and string. But was generally in good condition. He had no background on it and thought it might be a Chinese folk instrument similar to a Erhu.
Digging around on the internet trying to find an example that matched what was in my shop, I found nothing similar in Chinese or Japanese instruments. It struck me looking at it again that it really was more of a cigar box instrument. And low and behold there it was.

A member on Cigar Box Nation had posted photos of the Instruction Manual. I contacted him in an effort to get more information on the background of the piece and received this in response.


Comment by “Suspect Device”
The only surviving piece I have is an old neck my grandfather built. The box is long gone. I have been promising myself that I am going to build a few of these, based on the "original". Just haven't had the time. This sales brochure and the photographs are the only other info I have. I would love to see a pic of the one you are repairing. - Max

 
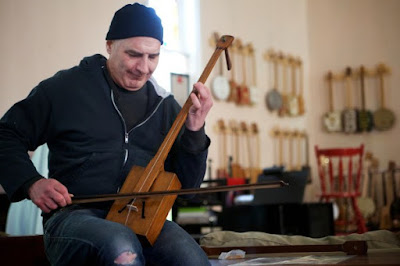
I sent along some photos and a drawing of the instrument's dimensions.


Comment by “Suspect Device”
My goodness! Thank you so much for posting these pics! My grandfather actually made that very instrument you have there. This is a really special thing for me to be able to see. The neck looks identical to the one I have. And thanks too for the neck angle info and the rest! That was another detail I have been wondering about. - Max

At this point it seemed to me that these two needed to be connected permanently so I contacted the dealer and passed along Max's contact information.

I took the Sangtoy to William Harris Lee in downtown Wilmette. It had been along time since I had repaired instruments on a regular a basis and I had no strings or bridges to fit to the instrument. I talked to the head of the shop and discovered we had a mutual quittance in Stan Schmidt who I trained under. While he fit the bridge and attached a 1/2 size cello string I told him the story of the instrument and its new owner. When I asked what I owed him he said "Nothing - Help someone else out some time".

 It seemed karmaticly to be the thing to do  - so I donated my time as well and packed up the instrument to send off to its new owner.


Thanks, Rob.

It was my grandfather's tinkering around with these one string fiddles that ultimately led me to building and selling my own primitive stringed instruments. It has been a very rewarding experience and having an original Sangtoy in my possession will kind of bring the whole thing full-circle. My mother is nearing the end of a long battle with dementia, and I often sit with her and play a cigar box guitar I built for her. She still remembers her father playing that one-string fiddle, and it all makes me feel that much closer to her, and to my grandfather. I can't wait to show her the Sangtoy!

I really appreciate the time you have taken to make this happen. Incidentally, 


I was surfing around on the internet and found that the Sangtoy was actually patented by my grandfather in 1921. I also found out a bit of info about the company, The Grand Rapids Toy Manufacturing Company, which later became The American Radio Cabinet Company. From what I can put together, my grandfather entered into the business with Robert Brown, a former high school classmate, in 1919. They were basically  just kids, barely a year out of Grand Rapids Central High School.

http://kent.migenweb.net/white1924/personal/amerradioco.html
 
Turns out the new owner is Max Jones. An accomplished and prolific cigar box instrument maker. In looking at his website I found a link to an article about him and his instruments. So glad to see the Sangtoy where it belongs.

http://bangordailynews.com/slideshow/saco-man-crafts-instruments-from-film-canisters-cigar-boxes-yardsticks-and-more/

Sunday, June 26, 2016

Upcycle

When I first saw the piece it was February, the temperatures were close to 0, and it was in the garage.  Needless to say the examination was brief and the photography scant.

The clients had owned the bookcase since the late 1970's. It was a Drexel Heritage wall unit similar in style to the Accolade Series but without the campaign corner hardware. The original case had been designed to house older bulky televisions behind pocket doors and had glass doors behind which you could put your stereo equipment.


Having recently updated and remodeled their home entertainment center/bookcase was in the garage on its way to the curb and the waste haulers.Was there any way I could :reconfigure it to fit in with their newly updated home?

Not one to shy away from a challenge (perhaps foolishly), I set about redesigning an alternative. Taking into consideration that the home remodeling had an Arts and Crafts feel and the fact that the cabinet no longer needed to house a deep TV. I set about altering the case to fit its new purpose and space limitations.

I decided to cut the outside cabinets to half their width and reduce the depth to 12" to house books, The center section was reduced to 16" and an upper section was added to bring it to full height. With the addition of a plinth, cornice and decorative elements the final piece would blend in nicely with its new surroundings.


Replacing the hardware proved to be one of the trickier portions of the remake. Since the original hardware was inlaid into the face. The old mortises needed to be filled in a way that would hide the original configuration.

Using a piece of paper I made a rubbing of the edges of the old mortises and then glued the template to the old panels from the doors I eliminated.


After band sawing out the shape, I trimmed and filed the blank untill it fit the opening as closely as possible.

While the patch was still fairly visible, the newly selected hardware would cover the majority of the repair. The final antiquing of the finish around the hardware would do away with all the remaining traces.


In the shop ready for delivery

Back where it all began


Thursday, June 16, 2016

A Message in a Bottle


Victoria and Albert Museum
One of the things I love most about my job is digging into who, what, where, and why of a piece of furniture. Nowadays with the amount of information catalogued on the internet, you can gleam an amazing amount of information from only a few clues.

I’m sure, for me, it goes back to my apprenticeship in the violin shop when I sat one night with Stan Schmidt, examining the top a Stradivarius under a high powered magnifier as he pointed of out the obvious marks of an un-sharpened scraper. Not the earmark of a master, but a craftsman in a rush. From then on I have been hooked on the stories an object alone can tell you.

Whenever I work on a piece I always let my mind wander to an image of the maker, what was his life like, what was the day like when he finished this piece? Was it a grand accomplishment or another meal on the table?

While researching a piece recently I came upon a blog describing a nugget of gold. Not just the whispers from the past in the hand of the artisan, but a letter from the artisan himself, hidden inside his work. When you look at the creation the message was found in... and then the contents of the letter itself – I’m sure you will agree this message in a bottle is almost a precious as the masterpiece it was hidden inside.

I found the article on the blog of the “Lost Art Press”. If you have not been there before, it would be well worth your time - to bookmark the site and return frequently.
https://blog.lostartpress.com/…/when-cabbage-and-peas-were…/

Thursday, January 29, 2015

Wood Sandwiches and Warped Doors


My Son was helping me out at the studio one day and he got a bit distracted. I know he said he was hungry but I wasn't paying attention.

Hence the salami and Swiss on rye sandwich.
Or rather amaranth and satinwood on pine.


I thought of this as I was thinking of this post.

The layering of wood into a "sandwich" adds some interesting and useful properties that can be utilized for fabrication and restoration.


Sandwiched Wood
Some History

Plywood has been with us arguably for centuries. I say arguably because  the references and discussion of purpose and reason vary.  The arguments go from stability of the groundwork to the conservation of materials  - and pun intended it falls somewhere in-between.
 
It has never been the material of choice for me - but it does have it's purposes. The oft quoted line is "If Chippendale had plywood he would have used it." He may have, but my gut feeling is that we would probably have fewer remaining examples of his craftsmanship.

By veneering your most precious materials on to a dimensionally stable groundwork you are conserving the valuable figured wood. Slicing the presentation timber into thin veneers allows you to cover a considerably larger amount of surface - as opposed to using the original board in solid.

Imagine a day on the end of this saw
This technique of cutting valuable timber into veneers was implemented regularly  in the mid 17th century for just this reason. The problem is that the process of cutting the veneers was done entirely by hand. A time consuming and very laborious process. Consequently, the fabrication of a plywood groundwork would have been much too labor intensive, therefore the resawn presentation veneers were typically laid upon a secondary wood of pine and sometimes mahogany.


The following earliest reference from an examination of an Egyptian coffin was done (in my opinion) entirely for stability. Wood expands and contracts with the addition and removal of moisture across its thickness. By layering thin sections of wood crosswise into an panel, the movement is minimized and counteracted by the opposing layers.

From Pharaonic Egypt
The oldest piece of plywood was found in a third dynasty coffin, made of six layers of wood each 4 mm thick and held together by wooden pegs. [11] Like modern plywood the grain of its layers was arranged crosswise to give it added strength. [12] From 1750 BCE onwards this plywood technique became widespread. The thickness of the layers was reduced to less than three millimeters and they were stuck together with a glue made from bone, sinew and cartilage applied hot. [13]


The Rush of the Machine Age

In 1797 Samuel Bentham applied for patents covering several machines to produce veneers. In his patent applications, he described the concept of laminating several layers of veneer with glue to form a thicker piece – the first description of what we now call plywood. Samuel Bentham was a British naval engineer with many shipbuilding inventions to his credit.

About fifty years later Immanuel Nobel, father of Alfred Nobel, realized that several thinner layers of wood bonded together would be stronger than one single thick layer of wood.

 Plywood was introduced into the United States in 1865 and industrial production started shortly after. In 1928, the first standard-sized 4 ft by 8 ft plywood sheets were introduced in the United States for use as a general building material.  From Wikipedia

With the advent of this invention it was now possible to manufacture engineered panels with increased strength and dimensional stability. A stable groundwork for veneer that was resistant to warp and shrinkage splits.

Which leads me to the subject at hand... warped cabinet doors.


Restoration

Warped doors on cabinets are a fairly common occurrence. Often they can be coaxed into an acceptable position by adjusting the hinges. This doesn't remove the warp but only balances the panel and frame in the opening.

In the case of our current patient a more invasive procedure was required. (Using what we've delved into previously plywood seems an option.) The stiles were warped and twisted enough to pull the door almost 2" out of plane when closed. Even the original heavy duty compression latch wasn't enough to keep it closed.


Taking apart the wayward door was in this instance almost half the battle. Being a newer reproduction piece the joints were glued with synthetic modern adhesive which proved to be rather resistant to dis-assembly.


Once the door was apart the stiles were bandsawed through their entire length to remove the tension in the wood caused by the warp. Before proceeding to the next step the saw kerf was cleaned up with a hand plane.


A new piece of wood, the thickness of the material removed by resawing was then glued between the 2 pieces of the stile and clamped on a flat surface to eliminate the distortion. A wood "sandwich", or in essence plywood. By gluing up the pieces with a core of quarter sawn kiln dried birch, the tension was distributed between the three pieces and the glue joint.

After removing the flattened piece from the clamps, the excess material was trimmed to blend with the original. The joinery was cleaned and refitted to correct for any remaining distortion and the door was re-assembled.


Stile in clamps
The "Sandwich" prior to trimming


The Completed Project


Closeup of spline


Additional Photos Here

Friday, December 6, 2013

Antique Show Exhibit


I'm exhibiting at this weekend at The 72nd Annual Woman's Club of Wilmette Antiques Show. If you are in the area - stop in and say hello!


For more information click here


Sunday, November 10, 2013

Locks and Keys

While not usually essential to the functioning of a piece of furniture. A working set of locks and keys does add to the aesthetic quality of an antique.

Subject to the same deterioration that effects the wooden structure,  the metal oxidizes, rusts away or simply wears down from use.

In the case of this pair of locks the bit on the  key supplied with the credenza was too short to through the bolt and one of the locks was missing the bolt entirely.

The locks themselves are from a 20th century reproduction but the mechanics and parts are essentially the same as those in a period mortise lock.

First stop - the metal scrap bin.

I collect bits of useable metal scrap left over from projects or salvaged as I find it.

To make the replacement bolt for the lock I needed some 1/8" thick mild steel.

Having found none in my "collection" I opted to make the missing parts in brass.


Making the Bolt

The brass stock was heated to remove its temper making it soft(er) and easier to shape. The remaining original bolt was removed and used as a template which I scribed around.


The shape was then cut out with a jewelers saw and finished up with needle files. 


Since the section of the bolt which extends out of the throat to engage the keeper is thicker than the internal plate, I cleaned the surfaces and brazed on enough material to make up the difference.


The finished locks with the parts in place


The Key
The bit on the supplied key was too short to engage the bolt and was therefore used to pull open the doors without actually locking or unlocking the piece.

As you can see in this photo the bit was short by about 1/8".


In order to correct the problem a small piece of brass was brazed onto the end of the bit and then filed to mate properly with the bolt.


Additional Information

I found this article explains a lot of the terminology and history
The Keys to Antique Furniture Locks by Fred Taylor

Additional Photos on Flickr

Saturday, November 9, 2013

Bits and Pieces

Completed Repair
This piece came into the studio with several condition problems.

The Chinese silk embroidery panel was distorted because of breaks in the support frame for the embroidery, and the stand itself was missing a carved bracket and several pieces of mother of pearl inlay.

My "impression" is that the silk in the frame is not the original occupant, but a period section of fabric trimmed to fit the original missing artwork.

The embroidery had been lined much like a canvas for a painting and the brown silk border was sewn around the spruce stretcher and then strung taut in a rather "shoe-lace" fashion across the back.

I started out by reinforcing the damaged stretcher support. Pulling back the lining and isolating the material with glassine, I glued the shattered spruce elements and reinforced the breaks with strips of new spruce.

A side note: the clamps are actually older style Intravenous tube clamps that I purchased at American Science and Surplus. The small hemostat clamps came from there as well. A great source for odd and unusual bits and pieces.


The frame itself was missing one of the carved support brackets so I traced one of the originals and set about carving the replacement.

The original is on the right


The mother of pearl inlay was an easier task. Again tracing the replacement from an original (in this case a flower) and then engraving the petal detail before resetting it in the groundwork.


Detail of the embroidery
As usual there are more photos on Flickr


Lid Repair


Stand Repair

Before

Turned Profile
Carved

Completed

The Original

The Replacement


Additional Photos on Flickr